
PART 3

COURSE OUTLINE:
1. CONTRAINDICATIONS
2. ACUSCULPTING ® WAIVER
3. INTAKE
4. ACUSCULPTING® NEEDLING PROTOCOLS PART 3: POSTERIOR (*MODEL ENCOURAGED FOR PRACTICAL PORTION OF TRAINING)
5. ACUSCULPTING® VIDEO TUTORIAL PART 3: POSTERIOR (*PAUSE VIDEO TO PRACTICE ON MODEL DURING THE PRACTICAL PORTION OF TRAINING)
1. CONTRAINDICATIONS
Acusculpting ® is for a healthy individual. If an individual is experiencing any type of extreme pain or disease the treatment should be solely dedicated to addressing these symptoms. Pregnancy, cancer, skin diseases and heavy medications are all contraindications for this protocol. Hormonal regulating drugs may also affect results.
Minor aches and pains as well as minor yin yang imbalances below a 5 on a scale of 1-10 may be addressed at the same time during sessions.

2. ACUSCULPTING ® WAIVER
SAMPLE:
*Please note this wavier should be used in addition to a regular acupuncture waiver/ consent form.
I _______________________________(client’s name) am aware that Acusculpting ® performed by ____________________________(practitioner’s name) involves a wide variety of techniques applied to hips, buttocks, abdomen, breasts, thighs among other areas of my body. My signature below indicates that it has been explained to me in a way that I understand including:
1. Risks involved with the procedure (ie: bruising and or lightheadedness in rare cases)
2. Frequency of treatments (ideally 3 treatments per week)
3. How the treatment will be performed and what areas of my body will be exposed during treatment
Patient’s Signature:_____________________________Date:___________________
Practitioner’s Signature:_________________________Date:___________________

3. INTAKE
During intake, it’s important to highlight the nature of the treatment and areas of the body that will be exposed/treated during the course of treatment. It is also important to be thorough about which modalities are being used (acupressure/guasha/cupping/tui na) and products to ensure that the patient is comfortable and knows what to expect.
Client expectations are important to discuss beforehand as clients may have a wide variety of ideas of what can be achieved through cosmetic acupuncture, although effective, each clients health, age and environmental factors(smoking, alcohol, stress) will affect the overall outcome.
Ideally, the protocol requires 3 visits a week and so it’s important to highlight treatment frequency for best results. However, the patient must be willing to commit to a minimum of 10 treatments.
You must also discuss a patient’s level of comfort with taking a before and after photo. However, if a patient is not comfortable with a photo, usually he/she will feel the treatment working by judging their own appearance and how their clothes fit. If you obtain consent for a before/after photo, you can also ask permission to use it for promotional purposes which will help to demonstrate your successful results for potential clients who are interested in trying Acusculpting®.
The client should allow for 75 minutes for the first session (intake and treatment). Before and after photos are ideally taken with the patient wearing the same clothing and standing in the same location (also consider your lighting and the distance that you take the photo – try to keep that consistent).
During the sessions, it is recommended that the client abstains from alcohol and excessive sugar and fats. The recommended diet consists of vegetables, with smaller amounts of fruit, grains, and protein. Recommend plenty of fluids and an active lifestyle and encourage a wide variety of exercise options such as yoga, tai chi, qi gong, running or walking, etc.
The client should also be advised that bruising may occur over the course of the sessions. It is recommended that the client does not wear makeup prior to acupuncture treatments. Recommend that clients allow 2-3 weeks to recover from any possible bruising during their sessions before planning an event such as a wedding, etc.
Treatments should be performed in 60-minute intervals to allow for the comfort of the patient. General body points are inserted first followed by specific Acusculpting ® points. Needles are retained for 30 minutes with the Acusulpting ® points removed first followed by the general body points.
“I received 3 treatments a week from Illya and by the 2nd treatment, my measurements started to go down. The 10 extra pounds I had been carrying for the last few years started to disappear, but the most impressive part was the reshaping of my upper arms and thighs. These are two of the most difficult, if not impossible to tone. By the end of the Acusculpting treatments, I had lost over 15 inches all over my body. In addition, I felt the best I had in a long time. My family and coworkers noticed both my energy change and the changes in my figure. This treatment set me back on course for the healthy lifestyle that I aspire to maintain. I plan on using Illya’s treatment regularly as a way to maintain my health and figure. - Emily, Victoria, B.C.”

“I had undergone a series of gua sha and Acupuncture sessions to target cellulite. The results were noticeable within a couple of treatments and significant changes to my body ensued following a series of 10 Acusulpting treatments. The overall well-being that came along with the treatments was an added bonus beyond my expectations. the advice given alongside was very useful and greatly appreciated. Illya provided a comfortable and professional practice that inspired and influenced me to maintain my own personal happiness and health. I look forward to working with Illya again. - April, Victoria, B.C.”
4. ACUSCULPTING® NEEDLING PROTOCOL PART 3: POSTERIOR
*Please study the general point prescription and areas of focus below thoroughly before using them in conjunction with the video segment during your practical portion of this course.
GENERAL POINT PRESCRIPTION:
If the patient has good health and organs are relatively harmonized the general acupoints used are:
Bl 13 Feishu, Bl 15 Xinshu, BL-18 Ganshu, Bl 20 Pishu, Bl 23 Shenshu, Bl 40 WeiZhong, Bl 57 Chengshan, Gb 34 Yanglingquan.
Alternate between two to three of each point below per needling groups per Acusculpting® session:
Group one
(Kd 3 Taixi, Kd 7 Fuliu, Sp 6 Sanyinjiao, Sp 9 Yinlingquan).
Group two
(Lu 7 Leique, Lu 9 Taiyuan, Li 4 Hegu, He 3 Shaohai, P 6 Neiguan, P 5 Jianshi, P 4 Ximen, Sj 10 Tianjing).
Examples of additional acupoints to be added if additional symptoms present:
Stiff neck – Si 3 Houxi, Gb 20 Fengchi, Gb 21 Jianjing, Bl 10 Tianzhu.
Stomach heat – Bl 21 Weishu, Gb 39 Xuanzhong.
Difficult sleeping – EX-NH-16 Anmiang.
Anxiety – HE 7 Shenmen, He 5 Tongli.
AREAS OF FOCUS:
Cellulite:
Cellulite forms in the hypodermis. This area consists of fat cell chambers, which are separated by walls of connective tissue (septa). In these large chambers, there are smaller chambers, which are compartmentalized clusters of fat cells. This combination of freestanding fat cell chambers and compartmentalized clusters of fat cells are the elements that create the change in appearance in the skin’s surface known as “cellulite”.
The five stages of cellulite:
Stage One
Blood vessels and capillaries begin to break down. Not yet noticeable to the naked eye, these compartments start the process of breaking down causing poor blood circulation, fluid retention, and lymphatic blockage. This causes waste entrapment in cells and connective tissues, which lay the foundation for cellulite.
Stage Two
Is marked by “orange peel” skin caused by further deterioration. Leading to increased clumping of fat cells and water retention.
Stage Three
The cellulite is visible without pinching the skin but not hardened. The fat tissues start to swell and push against the outer skin as a result of the build-up of lymphatic fluids. The first noticeable signs of cellulite appear.
Stage Four
The lack of oxygen and nutrients further exacerbate this condition, leading to the increased thickness of the septae. As this occurs, the fat cells are squeezed and trapped, leading to decreased circulation and further increasing the visibility of the “orange-peel appearance”.
Stage Five
The final stages consist of continued deterioration, thinning of the dermal layer as well as hard nodules consisting of fat cell clumps encased in a hardened protein shell. Cellulite is now at its fully matured stage. Fat cells are completely trapped and stored and cannot be flushed out due to a lack of proper blood circulation and a sluggish lymphatic system. Finally, the thick septae, stagnant fluids, and trapped fat cells result in the dreaded bumps and lumps of cellulite. Many factors are presumed in the cause of cellulite. Overall it is a response to poor circulation (qi stagnation with a possible combination of external epi wind, cold, heat, and damp). Genetics, lifestyle, and diet are contributing factors as well.
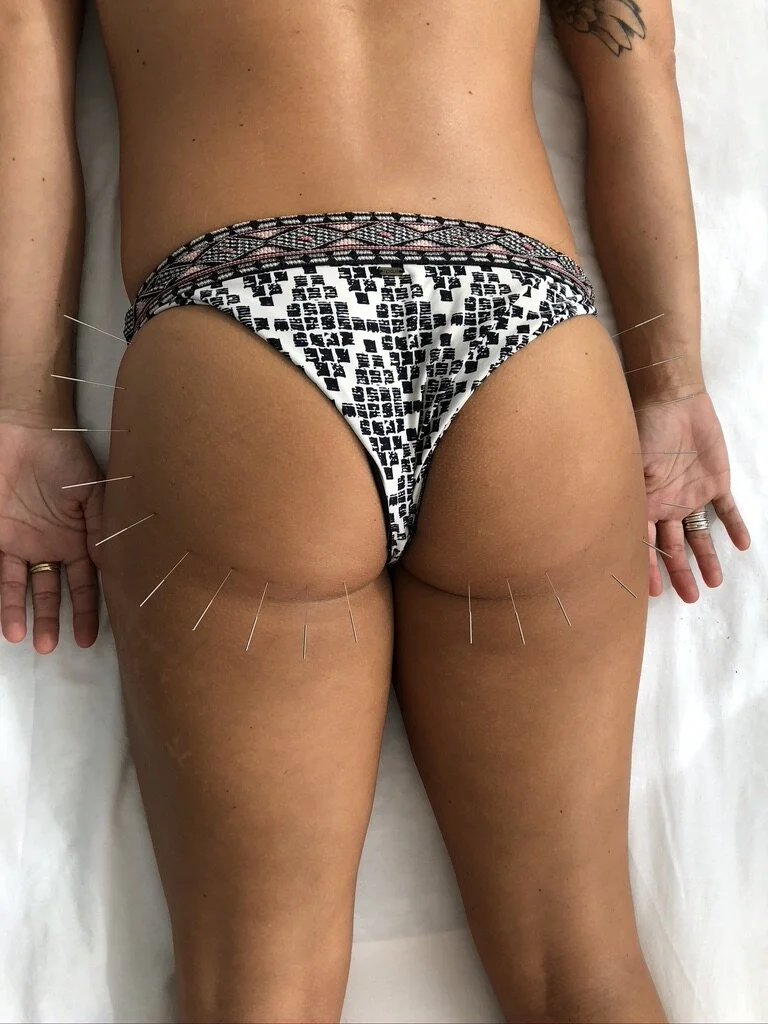
Buttocks: (needle size .30 *.60)
Surround the buttocks with needles inserted approximately 1 cun from the buttocks crease. Insert needles about 2 cun apart from, surrounding the focused area of treatment.

FIG 1 “BUTTOCKS (NEEDLE DIRECTION TOWARD THE SPINE)”
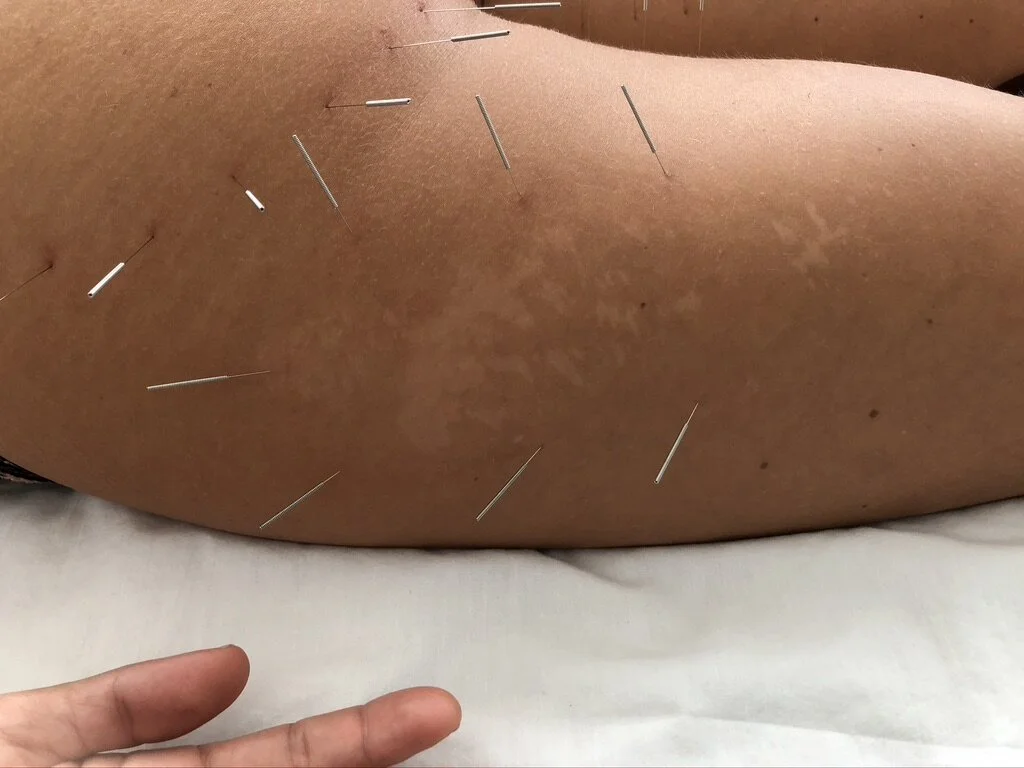
Legs (thighs): (Needle size .25 * .30 - .30 *.40 - .30 *.60)
Upper thighs lateral – posterior targeting excess tissue and cellulite using leaf technique. Excess tissue and cellulite are deposited generally in the upper thigh area around the greater trochanter. The leaf technique consists of surrounding the focused area of treatment with six needles proportionally, with a seventh needle inserted through the middle of the surrounding needles in the direction of the meridian in the shape of a leaf.

FIG 2 “LEGS/THIGHS (LEAF TECHNIQUE)”
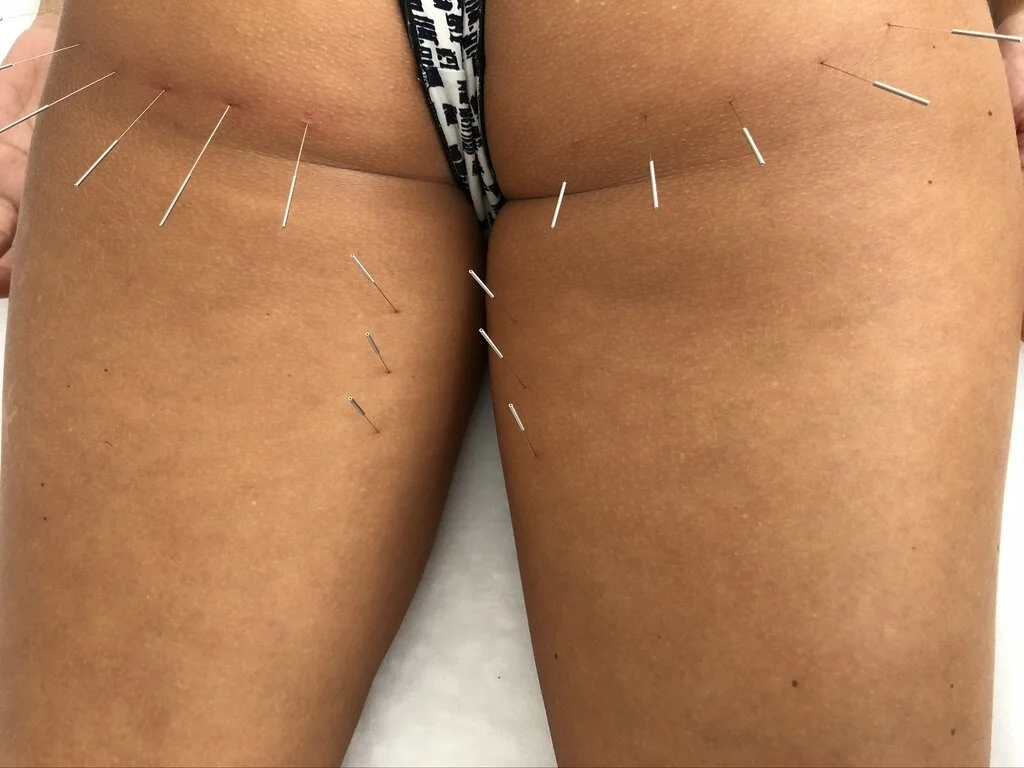
Additional areas: (Needle size .25 * .30 - .30 *.40 - .30 *.60)
The three needle technique is used for areas such as the inner legs and upper arms.
Three evenly inserted and spaced needles are inserted perpendicular into target tissues.

FIG 3 “THREE NEEDLE TECHNIQUE”
Coconut oil is applied to hips, thighs and buttocks followed with gua sha strokes over the targeted tissue in the direction of the meridian including J like strokes applied to the buttocks region alternating from one side of the patient to the next until the red sha is visible on the skin (gua sha is performed for about 6-8 minutes).
A hand towel is then placed over the right or left side of hip, thigh and buttocks. Tui Na is then performed on the gall Bladder and bladder foot meridian. Tui Na techniques such as shaking, pushing, needing and one finger acupressure to be performed to one side of the patient and then the other for approximately 4 minutes per side.
(*Please note, if it’s easier for you to print out the Acusculpting® Needling Protocol to follow along with the video tutorial below, please click the PRINT PDF button below. Otherwise, simply pause the video and scroll back up to refer to the course outline above.)
5. ACUSCULPTING® VIDEO TUTORIAL PART 3: POSTERIOR
(*PAUSE VIDEO TO PRACTICE ON MODEL DURING THE PRACTICAL PORTION OF TRAINING)

CLICK THE IMAGE BELOW TO PLAY VIDEO: